by Rachel | Business Ownership
Last week, I shared some super exciting news with you: my private practice and teaching studio is moving! We found the perfect location for our music therapy sessions, lessons, groups, classes…and a recording studio.
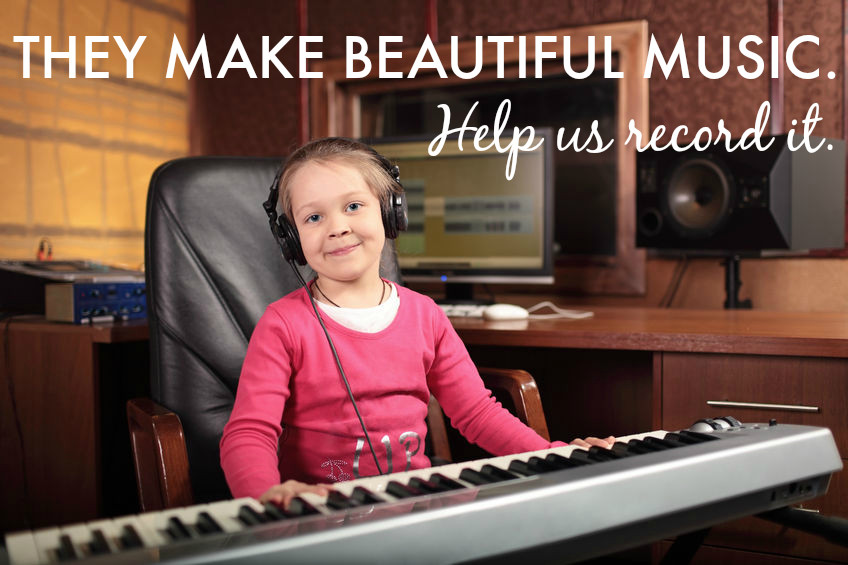
When we realized we had the extra space in our new building, we HAD to jump on the chance to create a dedicated recording studio. We love giving our students the opportunity to record their songs and original creations; not only does this allow them to hear their progress and share with their family, but it also fosters confidence, self-esteem, and a sense of accomplishment.
Those are important goals for ALL of our students, which is why we are raising funds toward equipment for our recording studio. As we make improvements on the new building and purchase other furniture and materials, we don’t quite have the room in our budget for extras — so we are asking for help.
 We’ve started an Indiegogo campaign to raise $1500 towards our recording studio, and we have just a little over a month to do it. Our move-in date is August 1, and it would be amazing to have the studio up and running when we open our doors at the end of the summer!
Our conservative goal of $1500 will cover the basics: microphone, headphones, speakers, preamp, and cables. Any additional funds we raise will go towards other equipment, including dedicated computer with recording interface, digital keyboard, and so on (right now we use our own personal equipment from home).
You can contribute any amount (every last dollar helps) and pay by credit card or PayPal. We are offering several perks to our donors to show our appreciation, including:
- recognition on our website
- digital downloads from our collection of original children’s music
- gift certificates to attend our groups and classes
- membership to our music resource websites
Click here to check out our campaign, and if you’re willing, make a contribution. Even if you can’t contribute monetarily, you can still help: spread the word by sharing this page with your friends via email and social media. Our budding recording artists thank you in advance!
by Rachel | Uncategorized

Earlier this week, my newsletter went out and included a free song download. (They all do….have you subscribed yet?) Several of the emails I received in response prompted this week’s post on a topic I’ve written about before at Listen & Learn Plus, but never here: mechanical licenses.
The emails I received asked if the free download, A Bushel and a Peck, is in the public domain — meaning it is not protected by copyright or the copyright has expired — and the answer is no. Just like I do with any other cover song (including this one), I went straight to Limelight to purchase a mechanical license.
A mechanical license allows musicians to create, distribute and sell recordings of compositions owned and controlled by another publisher. Even though I was giving my download away for free, I still needed a mechanical license in order to distribute it to others, since I don’t own the rights to the song.
Limelight makes this process quick and easy. You simply enter a few details about the song (title, artist, type and volume of distribution or sale, etc.) and then pay the fee that is determined by that information. My license for “A Bushel and a Peck” cost just $25. You can pay either by credit card or PayPal.
If you want more information, here’s a great article on this topic. Have you had any experience with licensing cover songs? And if so, did you use Limelight or another similar service?
by Rachel | Uncategorized

I’m a little sleepy this morning after a late night of recording…but I’m not complaining, because it’s one of my favorite things to do! So much so that I’m giving a presentation at AMTA National Conference in Atlanta next month called The DIY Approach to Recording.
One of the questions I receive most often through this blog is along the lines of, “What equipment do you use to record your songs?” I have two different methods for recording; the pictures above are from a live session with another musician. I use my Fender Passport sound system to record everything at once as a WAV file, which is saved to a USB flash drive.
I have another process and separate equipment for tracking, which is the method I use most often to record my Listen & Learn songs. I wrote a detailed post about that previously, which you can read here.
Music therapists, if you are interested in learning more about my recording methods, I’d love for you to attend my presentation at conference! It’s early (Sunday, November 20 at 8:00 am) but I promise I’ll make it worth your while.
by Rachel | Uncategorized
I may be turning 28 next month, but I’m still allowed to make a wish list for my birthday! With my new studio transformation in progress, most of the things I’m asking for relate directly to my work — though that is almost always the case. (Last Christmas, my parents insisted that I put at least one thing on my list that didn’t concern music or technology.)
So here are the top 3 items on my loooong list of wants. Let’s just say I would be more than pleasantly surprised if I receive them on June 5.

iPad 2: I’ve actually gone back and forth on this one. As awesome as the iPad is, I just don’t know if I really need it. For one, my husband has one and gives me free reign over his whenever I want. Also, I already have an iPhone. But the more I read about the iPad and explore the apps that are available, the more convinced I become that it would be a useful tool in my studio.

Airturn Page Turner: This is one of reasons I want the iPad. The idea of my students and I being able to play using sheet music displayed on the iPad or Mac (of course, I would also need this) and use a foot pedal to turn the pages is just awesome.

Blue Mikey: A microphone for my iPhone. I am a huge fan of Blue Microphones and have been using the Snowball for years. But sometimes during a lesson or music therapy session, I don’t necessarily want to set up my computer and microphone. I’d love to be able to just plug this bad boy into my iPhone and start recording. I do this every once in a while with the voice memo app, but it would be nice to get a more high quality sound.
What music & technology related items are on your wish list?
by Rachel | Uncategorized
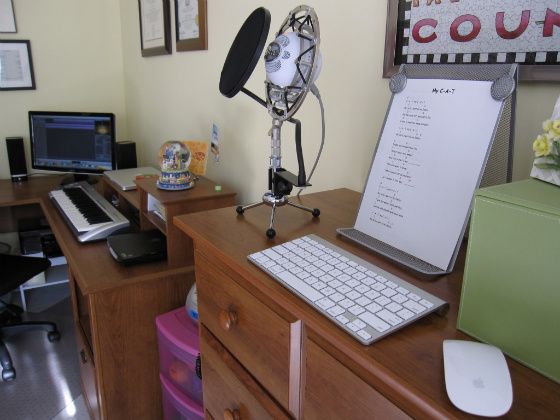
Two years ago, my “home recording studio” consisted of two things: a 13″ Macbook and a $12 Logitech microphone. Though it wasn’t fancy, it did the job, considering I was simply recording music therapy songs for the students at my school. But the more songs I wrote and the more interested I became in home recording, the more sophisticated my setup became.
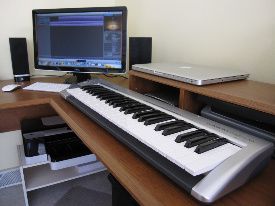
Now that I sell my self-recorded music (in addition, of course, to my studio album) both in my own store and on larger platforms like Songs For Teaching, I have a much higher standard of quality. That comes with a need for higher-quality equipment, which is the topic of today’s post. The picture above gives you an overview of my home studio, but I’m going to break it down for you even further. Let’s go!
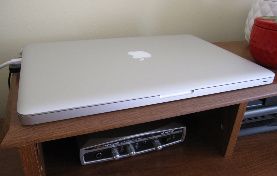
The #1 most important component in my setup is my computer. My 15″ Macbook Pro powers the software I use, which is Garageband. This program is included with the price of the computer, and for entry-level software, it is really quite powerful. Although I’m sure there are great recording programs for PC, I am most decidedly a “Mac person” and simply love the intuitive interface, ease of use, and integration of Garageband with iTunes.
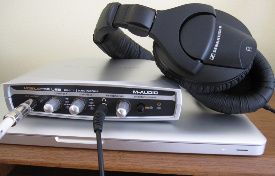
Pictured on the right is my M-Audio USB MobilePre Preamp, which I use to record my acoustic-electric guitar and monitor my sound input. I wrote a detailed post about the preamp earlier this year. The Sennheiser headphones I use are awesome; they cover my ears completely, are crystal-clear, and have a long coiled cord that reaches from one end of my studio to the other.
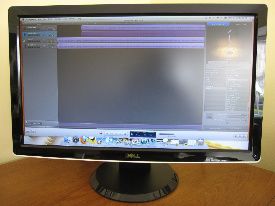
This 24″ Dell HD monitor was a birthday gift from my husband, and for someone who spends so much time in front of the computer, it has truly been a game-changer. The wide screen view is especially useful for Garageband; when I’m tracking instruments and vocals, it’s nice to be able to see big chunks of audio at a time. The monitor is connected to my computer with an HDMI cable and adapter.
Next is my M-Audio midi keyboard, which I use to record keyboard and other instrument sounds. It connects via a USB cable, so basically, all I have to do is plug in (Garageband immediately recognizes the MIDI input) and then I’m ready to play. I have a super duper deluxe model at school, which has so many features I haven’t even learned half of them yet. That will be a project in itself when school starts!
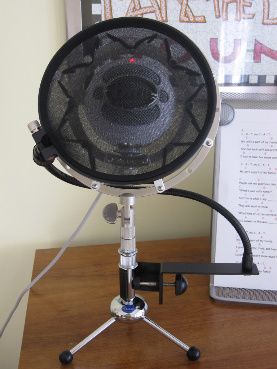
The piece of equipment that I’ve had the longest (December of 2008) and that I recommend to anyone who asks is my Blue Snowball USB Microphone . I get lots and lots of emails from people wanting to know what I use to record my vocals, and I delight in telling them that it’s a simple USB mic that costs less than $100. I have a ringer shockmount
 attached as well as a pop filter
 .
.
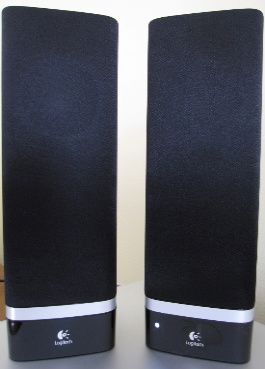
My speakers are relatively new, and I’m head over heels about them. These Logitech Omnidirectional USB Speakers are inexpensive, loud, and high-quality. They also look really nice! Although I listen to all of my recordings through headphones, I also want to make sure they sound good through speakers, since that is how most other people will be listening to the songs.
If you’ve been keeping track, you’ve noticed that 4 of the pieces of equipment I’ve covered connect via a USB port. Any Mac user knows that the computer only offers 2 USB ports, which is why I use a Rocketfish USB Hub to power my entire studio without plugging and unplugging anything. It only takes up one USB port on my computer, and the best part is that it has a suction cup, so I can attach it to the backside of my desk in order to hide the spaghetti factory of wires and cords.
Two last pieces of equipment to mention, and then I promise I’ll end this insanely long post :) These are crucial if you use an external monitor: the Apple Wireless Keyboard and Magic Mouse. As you can see in the first picture, I record my vocals relatively far away from my computer and monitor, so instead of walking back and forth in between takes, I can bring my keyboard and mouse over to control things remotely.
So there you have it: the Listen & Learn home recording studio. There are definitely things I’d like to add to it over time, but for now, I’m quite happy with it. I’m also more than happy to answer any questions you might have about the equipment I’ve mentioned, or just home recording in general. Let’s tackle them in the comments!