
Two years ago, my “home recording studio” consisted of two things: a 13″ Macbook and a $12 Logitech microphone. Though it wasn’t fancy, it did the job, considering I was simply recording music therapy songs for the students at my school. But the more songs I wrote and the more interested I became in home recording, the more sophisticated my setup became.
Now that I sell my self-recorded music (in addition, of course, to my studio album) both in my own store and on larger platforms like Songs For Teaching, I have a much higher standard of quality. That comes with a need for higher-quality equipment, which is the topic of today’s post. The picture above gives you an overview of my home studio, but I’m going to break it down for you even further. Let’s go!
 |
 |
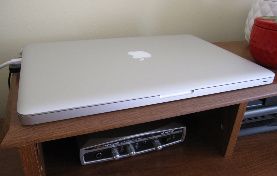
The #1 most important component in my setup is my computer. My 15″ Macbook Pro powers the software I use, which is Garageband. This program is included with the price of the computer, and for entry-level software, it is really quite powerful. Although I’m sure there are great recording programs for PC, I am most decidedly a “Mac person” and simply love the intuitive interface, ease of use, and integration of Garageband with iTunes.
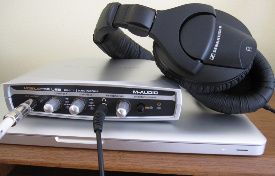
Pictured on the right is my M-Audio USB MobilePre Preamp, which I use to record my acoustic-electric guitar and monitor my sound input. I wrote a detailed post about the preamp earlier this year. The Sennheiser headphones I use are awesome; they cover my ears completely, are crystal-clear, and have a long coiled cord that reaches from one end of my studio to the other.
 |
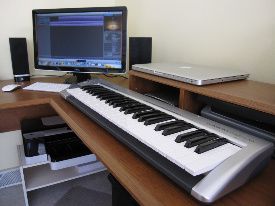 |
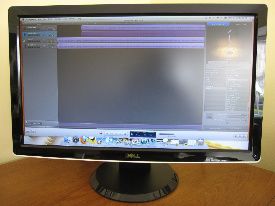
This 24″ Dell HD monitor was a birthday gift from my husband, and for someone who spends so much time in front of the computer, it has truly been a game-changer. The wide screen view is especially useful for Garageband; when I’m tracking instruments and vocals, it’s nice to be able to see big chunks of audio at a time. The monitor is connected to my computer with an HDMI cable and adapter.
Next is my M-Audio midi keyboard, which I use to record keyboard and other instrument sounds. It connects via a USB cable, so basically, all I have to do is plug in (Garageband immediately recognizes the MIDI input) and then I’m ready to play. I have a super duper deluxe model at school, which has so many features I haven’t even learned half of them yet. That will be a project in itself when school starts!
 |
 |
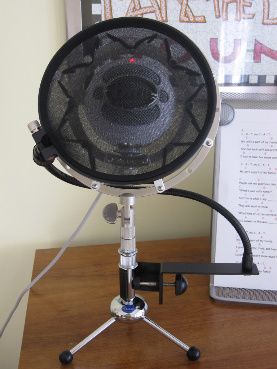
The piece of equipment that I’ve had the longest (December of 2008) and that I recommend to anyone who asks is my Blue Snowball USB Microphone. I get lots and lots of emails from people wanting to know what I use to record my vocals, and I delight in telling them that it’s a simple USB mic that costs less than $100. I have a ringer shockmount
attached as well as a pop filter
.
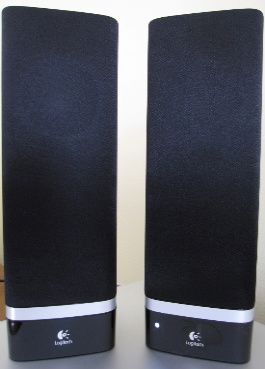
My speakers are relatively new, and I’m head over heels about them. These Logitech Omnidirectional USB Speakers are inexpensive, loud, and high-quality. They also look really nice! Although I listen to all of my recordings through headphones, I also want to make sure they sound good through speakers, since that is how most other people will be listening to the songs.
If you’ve been keeping track, you’ve noticed that 4 of the pieces of equipment I’ve covered connect via a USB port. Any Mac user knows that the computer only offers 2 USB ports, which is why I use a Rocketfish USB Hub to power my entire studio without plugging and unplugging anything. It only takes up one USB port on my computer, and the best part is that it has a suction cup, so I can attach it to the backside of my desk in order to hide the spaghetti factory of wires and cords.
Two last pieces of equipment to mention, and then I promise I’ll end this insanely long post :) These are crucial if you use an external monitor: the Apple Wireless Keyboard and Magic Mouse. As you can see in the first picture, I record my vocals relatively far away from my computer and monitor, so instead of walking back and forth in between takes, I can bring my keyboard and mouse over to control things remotely.
So there you have it: the Listen & Learn home recording studio. There are definitely things I’d like to add to it over time, but for now, I’m quite happy with it. I’m also more than happy to answer any questions you might have about the equipment I’ve mentioned, or just home recording in general. Let’s tackle them in the comments!


That's quite impressive! I enjoyed learning about all the techy tools you use–I'm sure they will come in handy for me in the near future!
YES! This is a post I've been waiting for! Thanks, Rachel =) I love your recommendations!
Thanks Mikaela and Kat! Glad it was helpful. Now I can direct all those emails right to this post :)
Very helpful post! Now I know how the sound quality of your sound files is so good. Since I have a Mac and new Snowball mic as well, I now have hope that my own sound quality will be better in the future. Would you mind sharing sometime how you edit sounds in Garageband? That program probably can do way more than I'm aware of.
Great, Christine! I'm happy to help. I would love to do a post on editing on Garageband, and will plan for that in the next couple of weeks. In the meantime, could you send me any specific questions you have so that I make sure to answer them in my post? Thanks!
Thanks for letting us ‘behind the curtain’. :) What are the ringer shockmount and pop filter, and what do they do?
My pleasure! The ringer shockmount absorbs the shock caused by movement near the mic and prevents it from compromising the recording. The pop filter is to block the popping sound you make when you say certain letters like “p”.
Are you using pick-ups on your steel string guitar or playing the guitar directly into the Snowball mic? Have you ever tried recording a nylon string guitar?
I use pick-ups (plugged into a pre-amp) for my steel string. In my older recordings, I just played into the Snowball. I’ve not tried recording using my nylon string guitar, but that would make for a nice contrasting sound. Maybe I’ll try that soon!
I am trying so hard not to be jealous! I’m about a year away from being able to set up a home studio, and it’s hard to wait. Thank you so much for such a nice post with great tips! I’m taking notes so that when the day comes I’ll be able to start on the right foot.
I’m looking forward to exploring your site – I found it through Blogher.
Thanks for reading! When it comes time to set up your studio, let me know if you have any questions or need additional advice. I’m happy to help :)
I bought the shock mount and pop filter but haven’t installed them quite yet. Do you leave the microphone all set up with those attached? Any advice for storing them that way? I don’t have the luxury of leaving a studio set up all the time.
Yes, I leave them attached to the microphone all the time, because I use it so often. I keep it in the same spot where it is pictured at the top of this post, but I could see how it might be sort of a pain to store elsewhere. Maybe a closet or on a shelf?
I have been reading your recording information and see that you are a Mac user. Is there a MT you would recommend who has a PC set-up for recording? I am new at this technology thing and am looking for guidance in recording live sessions with my hospice patients. Thanks.
I could not live with out my Mac in my home studio. I used to be on a really good PC, but since the transition to the Mac it’s been a like an opening of a whole new world. The only thing I miss is the software choice. Great post Thanks…
This is so helpful Rachel, thank you!
After recording CDs in two different studios i came to conclusion that it would be much less expensive to set up my own recording studio. So now I am “collecting” all the important supplies.
Your post with links is very helpful :-)